I’ve always loved decorating with angels, and creating new and unique ones is such a joy for me. We have the most amazing set of angel wing appliqués on our website, and I can’t wait to use them in a fun DIY angel project!

You can grab these beautiful angel wings right on our website—just click the link below!
https://theshabbytreeboutique.com/set-of-3-angel-wing-appliques/

You can find the list of supplies that I’ll be using for this angel down below.
1. One pine cone dripping garland from our website
2. One 8 inch doily from our website
3. Sherpa blanket from Five Below
4. Surebonder fabric glue
5. Hot glue
6. Cardboard
7. Poly-fil stuffing
8. X-acto knife
9. Scissors
10. Light Buttermilk acrylic paint
11. Ribbon
12. Paint brush
13. Angel wing appliqué from our website
14. Wire

The first thing you’ll want to do is trace the angel wings onto a piece of cardboard.


Once you’ve got the wings traced, go ahead and grab your X-Acto knife to carefully cut them out.


Next, paint the cardboard with a coat of Light Buttermilk acrylic paint.

I went ahead and painted both sides of the cardboard, and once the paint is completely dry, you can glue the wing appliqués right on.


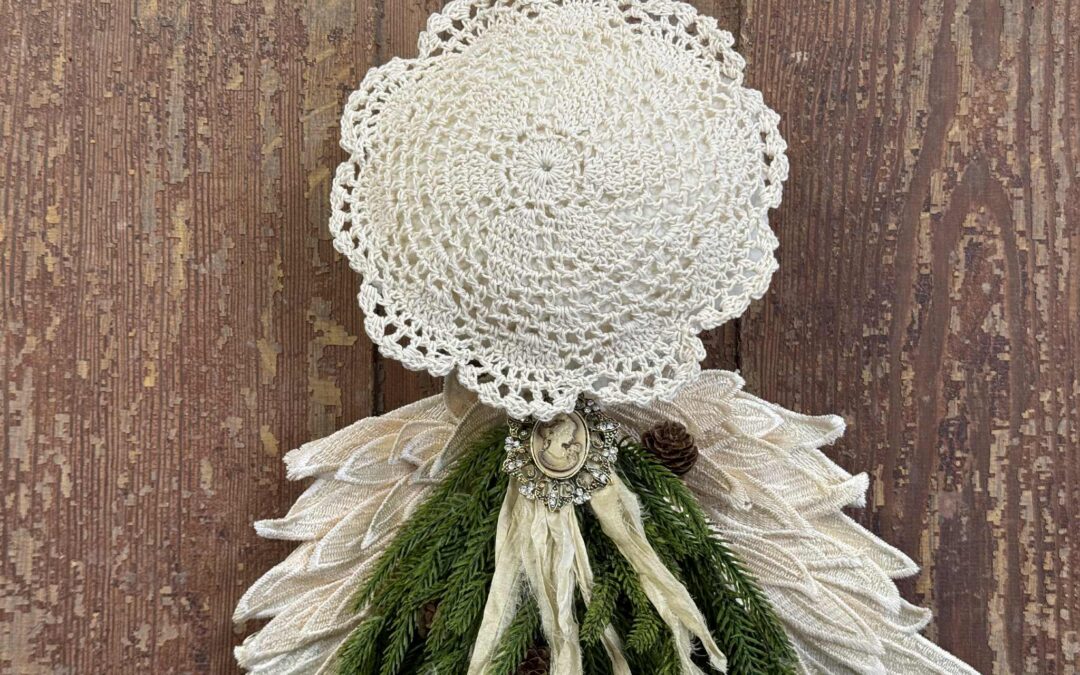
After finishing the wings, it’s time to create the angel’s head. I’m using a cozy sherpa blanket from Five Below, but you can use whatever fabric you like best.

Lay the doily on top of your folded fabric with the good sides facing in. Then, use a marker to trace right around the edge of the doily.

The next step is to cut out your circle. Once it’s ready, add a little bit of Surebonder fabric glue around the edge.

Apply glue around the edge of the bottom fabric piece, working in small sections so it’s easier to manage. Lay the top fabric piece over the glue and gently pinch the two layers together as you go.

Be sure to leave about a two-inch opening so you can add the stuffing and tuck in your greenery drop.

Turn the fabric inside out, then go ahead and add your stuffing.


Once the stuffing is in place, go ahead and tuck the greenery drop right into the opening.


Use the wire ends to twist together and create a little hanger for your angel.

The next step is to glue the doily right onto the angel’s head.


Add a bit of glue to the back to attach the wings securely in place.

I finished mine off with some ribbon and a bling embellishment—this part is totally optional, but it adds such a pretty touch! You can find the ribbon on our website by clicking the link below.


This angel is so simple to make, and it’s sure to look beautiful anywhere in your home. I hope you’ll get creative and give it a try!

I purchased one of each color! Making my two daughters the denim jackets with the wings on back. I always give them a memorial piece in honor of their brother that was killed in a car crash in 2022. 🩷💔🩵🩷🩷
Love the Friday Night Hangout project! Beautiful! I plan on watching tonight. Thanks Barb!
Simply precious.
Looks very nice and easy to make. Will join you on Friday
What a sweet and charming angel. I love her. She’s heavenly. Looking forward to Friday Night Hangout. You did it again Barb, another delightful creation. Thank you fir all you accomplish.
Came put beautiful have the wings. Might try this. You are amazing Ms barb
I can’t wait for Friday Night Hangout!
I look forward to it every week!
Like this see you at Friday night crafting
Will be hanging out with you tomorrow night. These angel wings are so pretty.
I love this Barb!! She’s darling!! See you tomorrow night!! 😇♥️🌲
Beautiful Angel Barb, love it ❤❤❤❤❤looking forward to Friday night hangout
Looking forward to Friday Night Hangout.The Angel is so unique, you are incredibly creative Barb!
Barb, this angel came out absolutely adorable. It is so so cute. I can’t wait for Friday night hang out. Thank you for everything you do.💗🤗
Barb she’s absolutely beautiful I love it I might have to give this a try when I’m feeling better 😁
Beautiful
I love angels so will definitely watch and try to collect items. Very creative. Thank you
Barb, This Angel is absolutely breathtaking. I love it. She’s so lovely with the lace, doilies looking vintage.
Beautiful
So whimsical! 🪽❤️