The Shabby Tree
  • Home
  • About Us
  • Subscribe
  • Must Have’s
  • App
  • Blog
  • Boutique
    • Shipping Information
  • The Shabby Tree Box
  • Contact Us
Select Page

DIY Lace Cross

by blewis | Jan 8, 2026 | Easter/Spring, Everyday DIY, Holiday, Home Decor | 29 comments

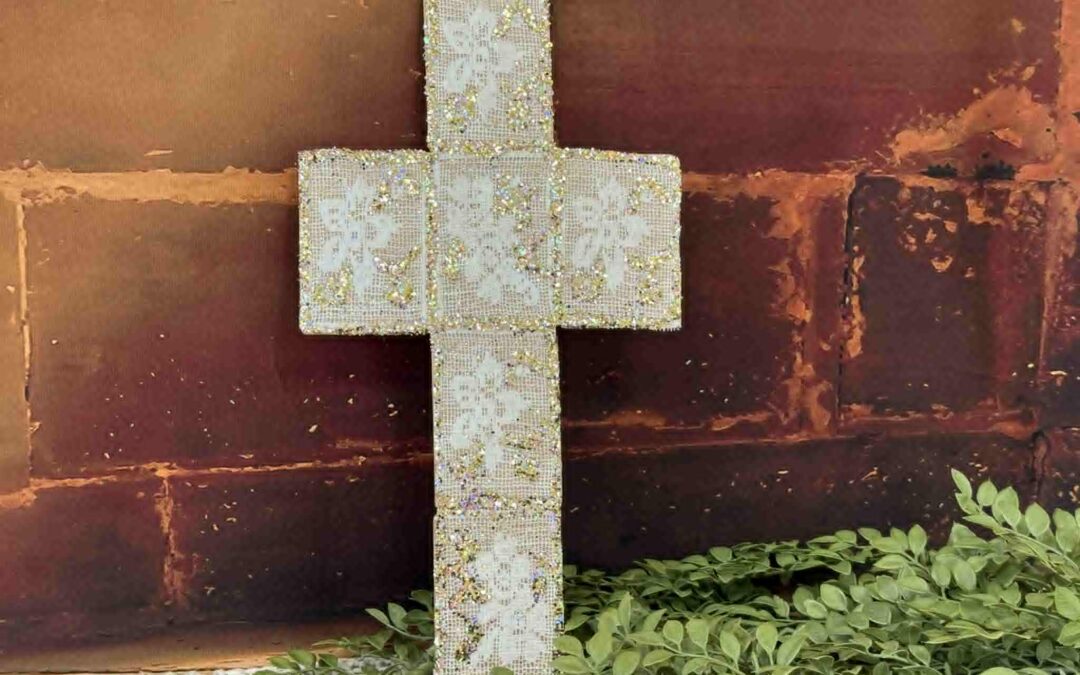
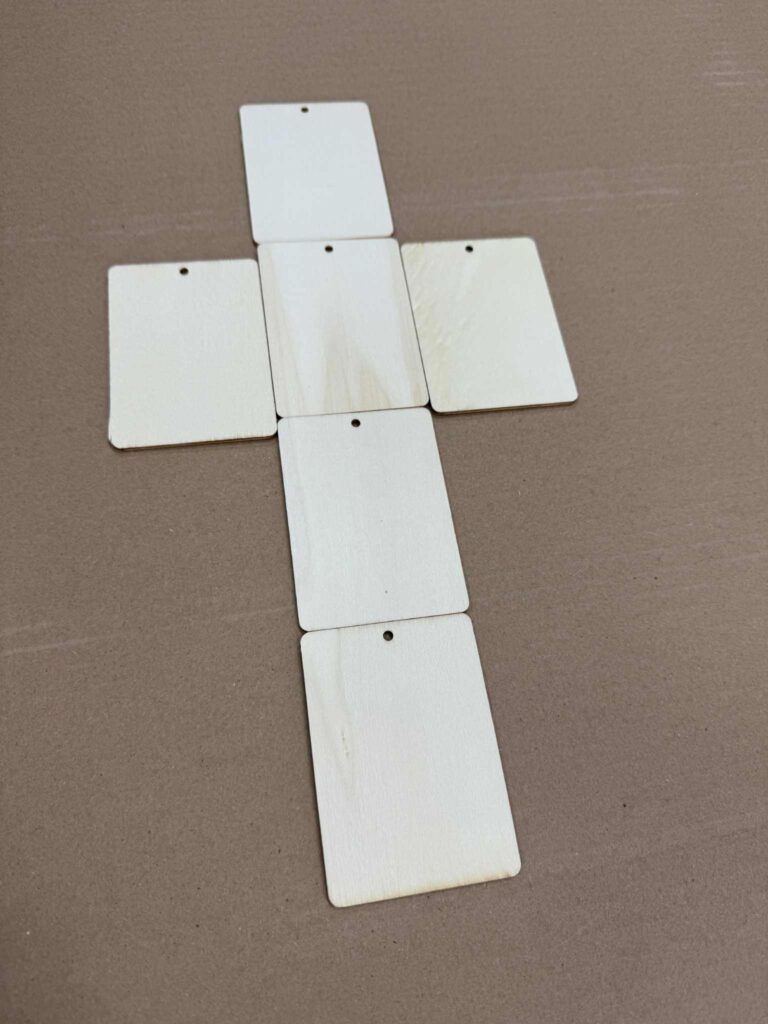
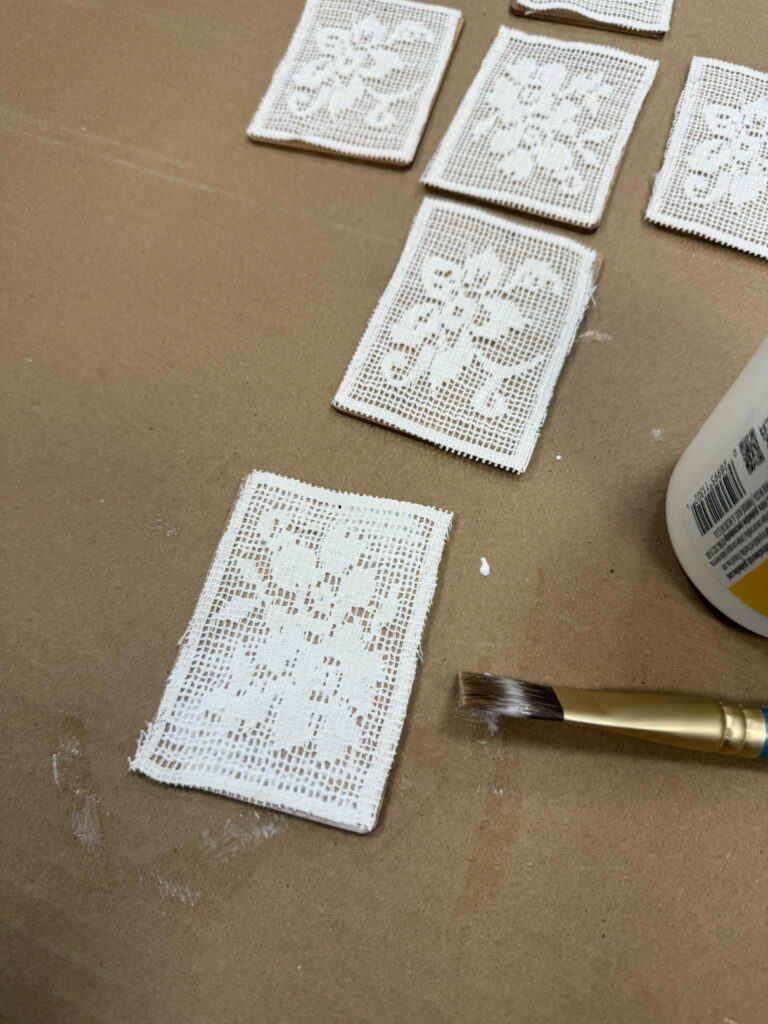
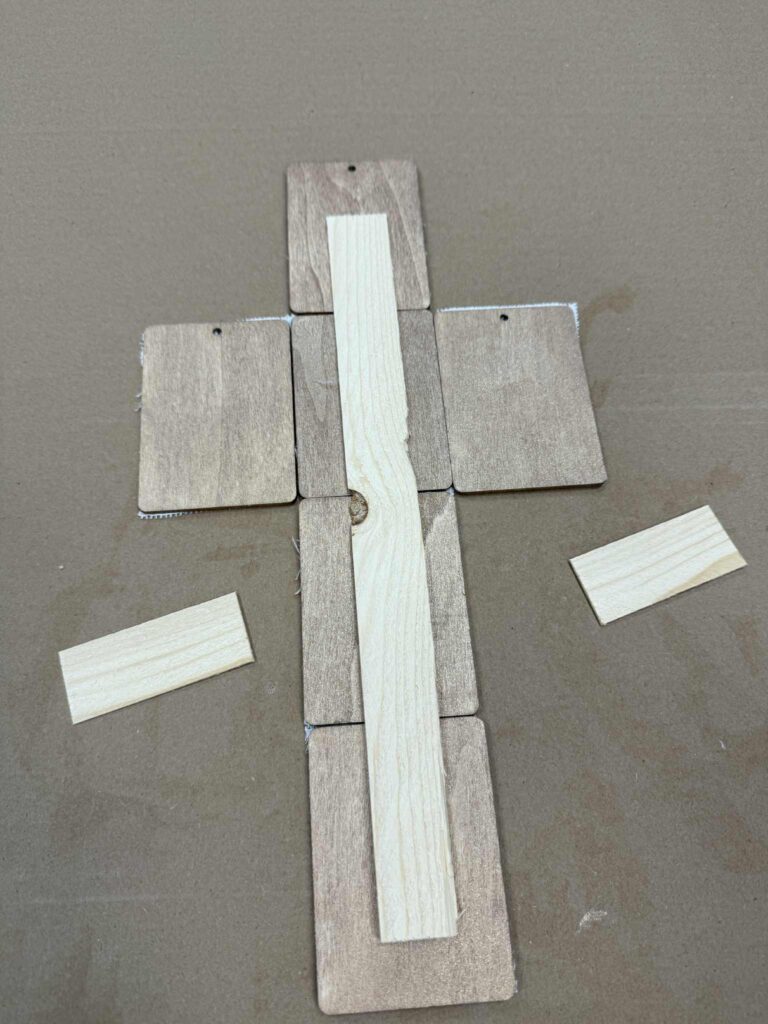
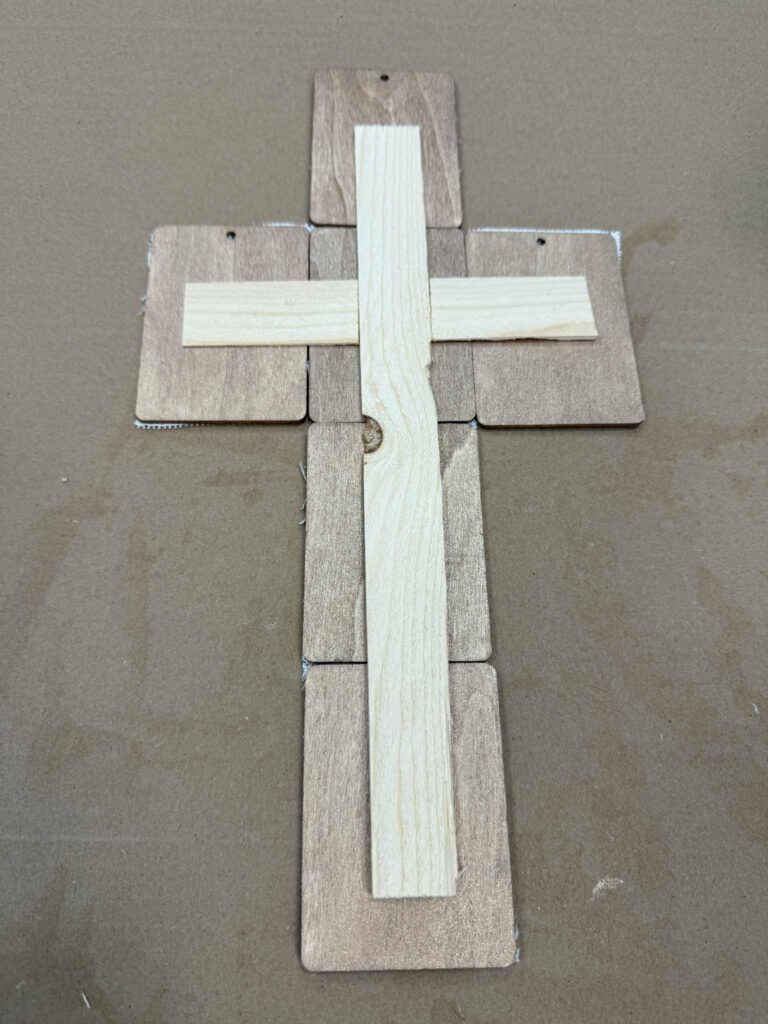
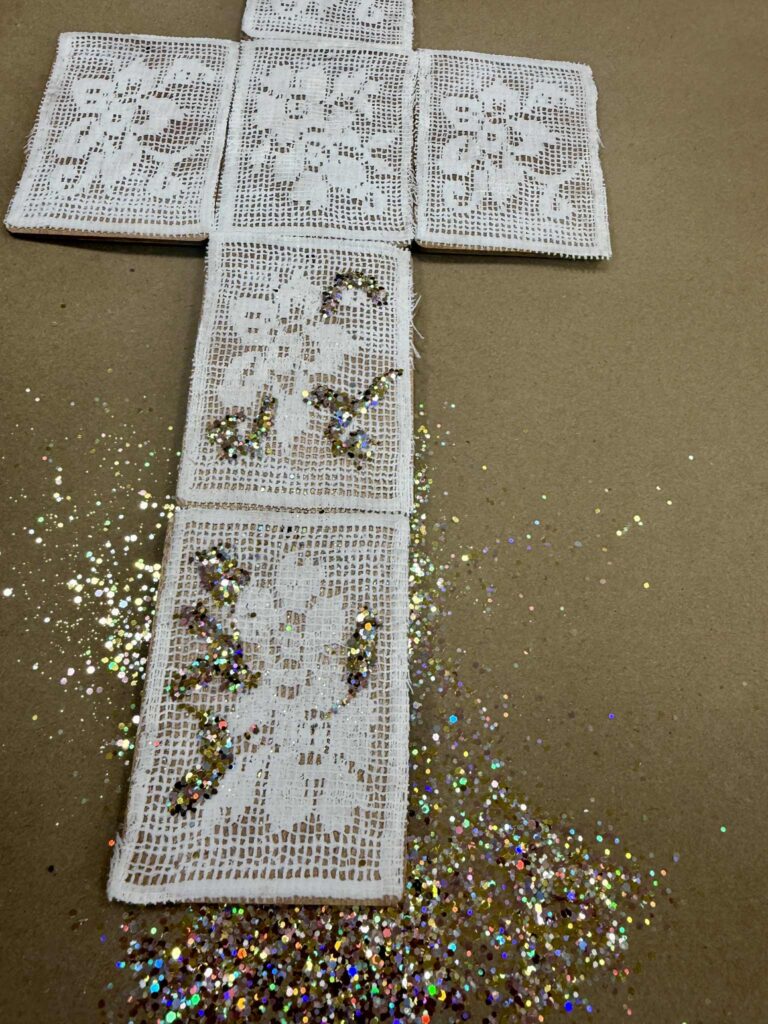
I absolutely love lace, and I’ve been having so much fun seeing all of the beautiful lace pieces we’ve been adding to our website lately. One piece in particular really caught my eye, and I knew right away that I wanted to turn it into something special. That’s what inspired me to use it to create a one-of-a-kind decorative cross that has both texture and character.

The square pattern on this lace makes it perfect for this project and helps keep things quick and easy. Since the print is already laid out in a grid, it naturally guides you when forming the shape of the cross, taking the guesswork out of measuring and cutting. This makes the whole process simple and beginner-friendly while still giving you a beautiful finished piece.

You can find the list of supplies that I’ll be using for this cross down below.
1. Lace from our website
2. Two wooden shims
3. Mod podge
4. Hot glue
5. Tacky glue
6. Sand & Serenity Glitter from 143Vinyl
7. Antique bronze metallic paint
8. Six unfinished wooden rectangles
9. Scissors
10. Paint brush
The first thing you’ll want to do is cut out the individual squares from the lace. I chose to use six squares for this cross, which creates a nice balanced shape without feeling too large or too small. You can always adjust the number of squares if you want to change the size, but six worked perfectly for the look I was going for.
You can find the lace that I am using on our website here: https://theshabbytreeboutique.com/timeless-lace-fabric/?searchid=676517&search_query=timeless
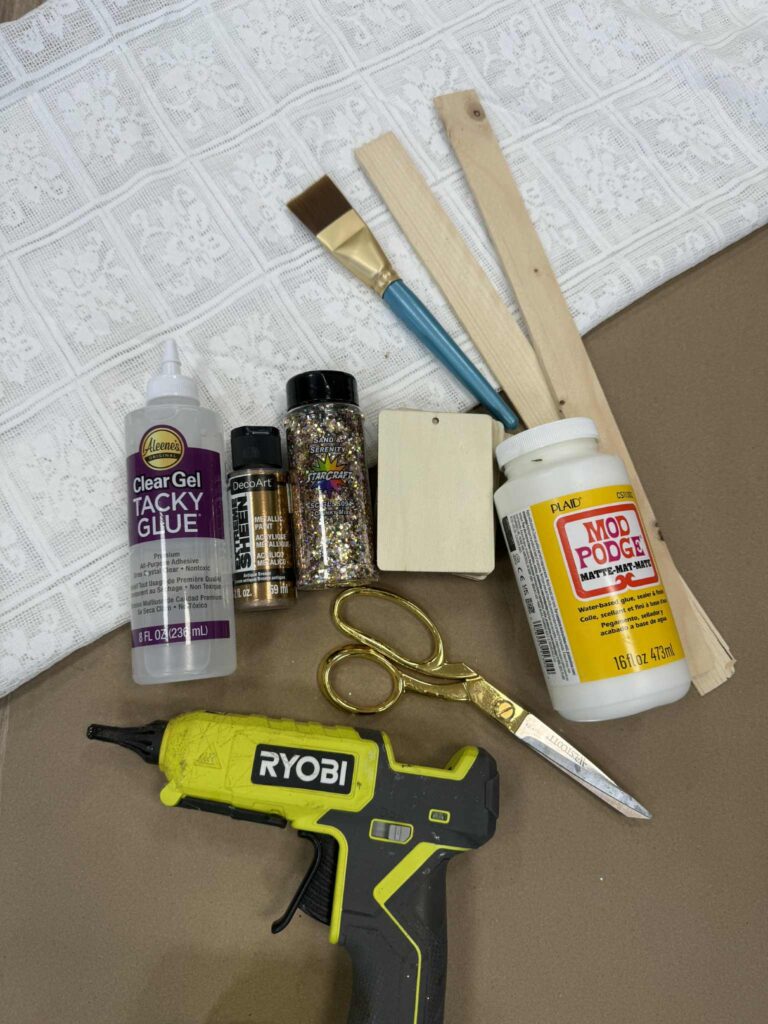
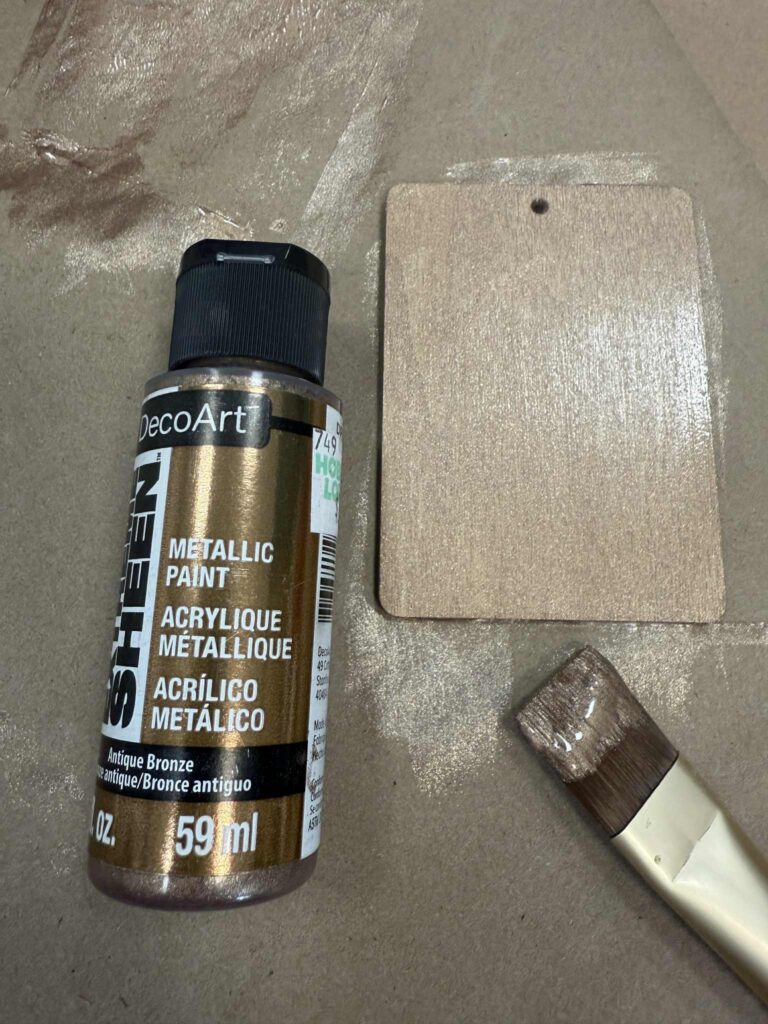
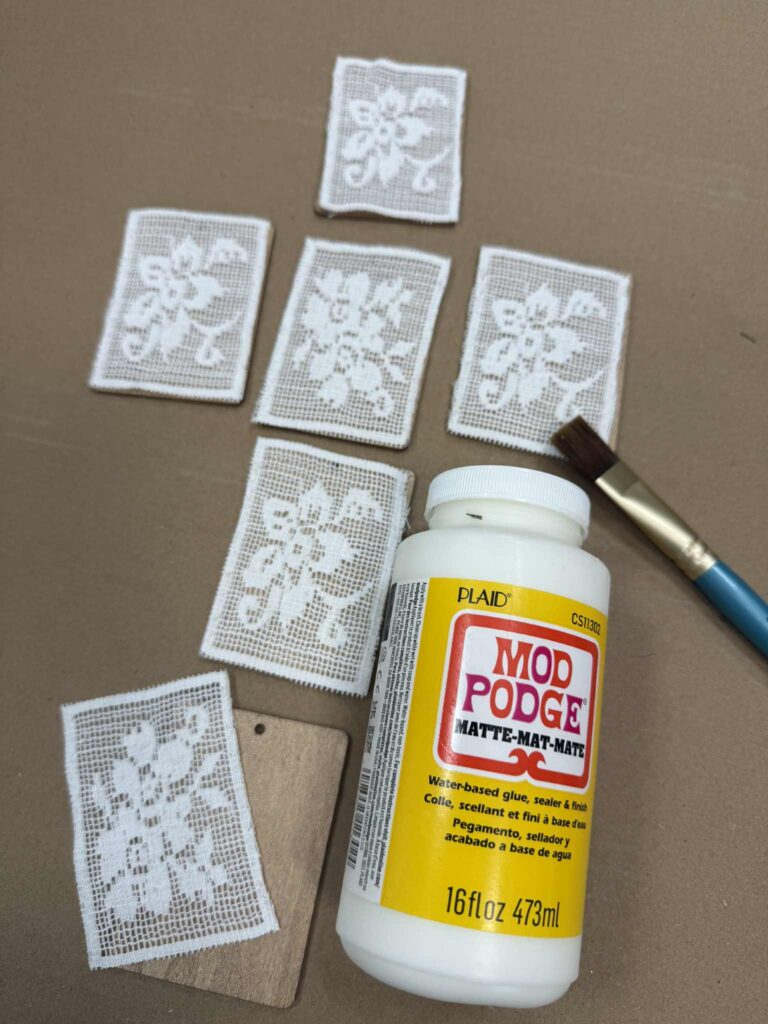
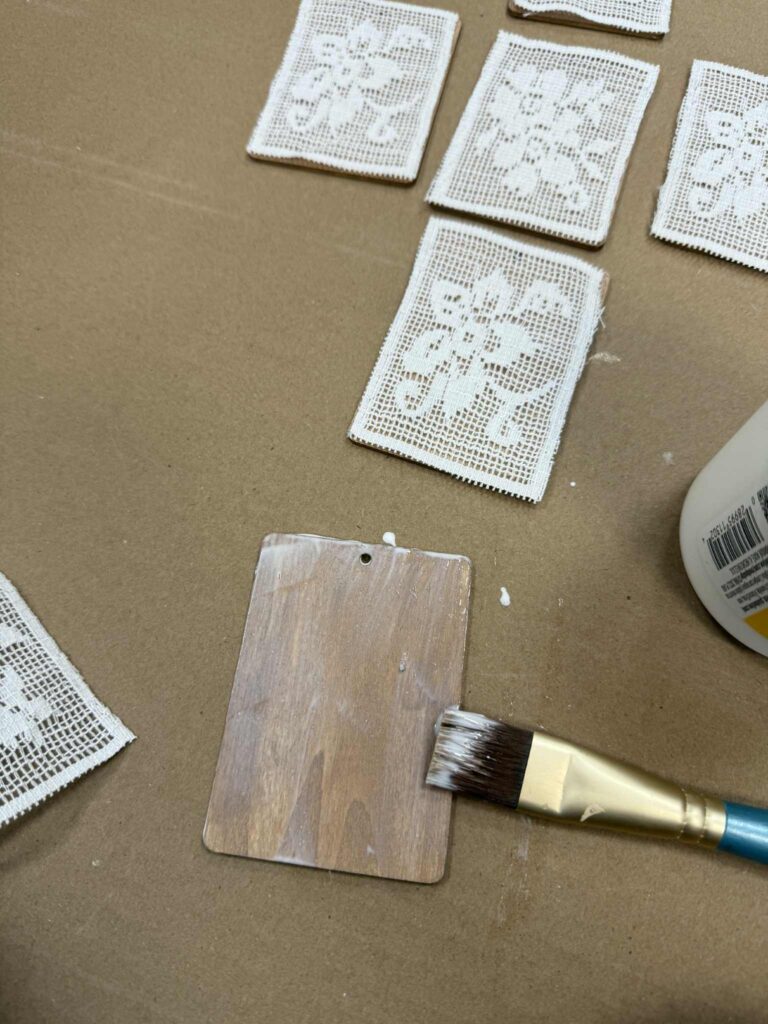
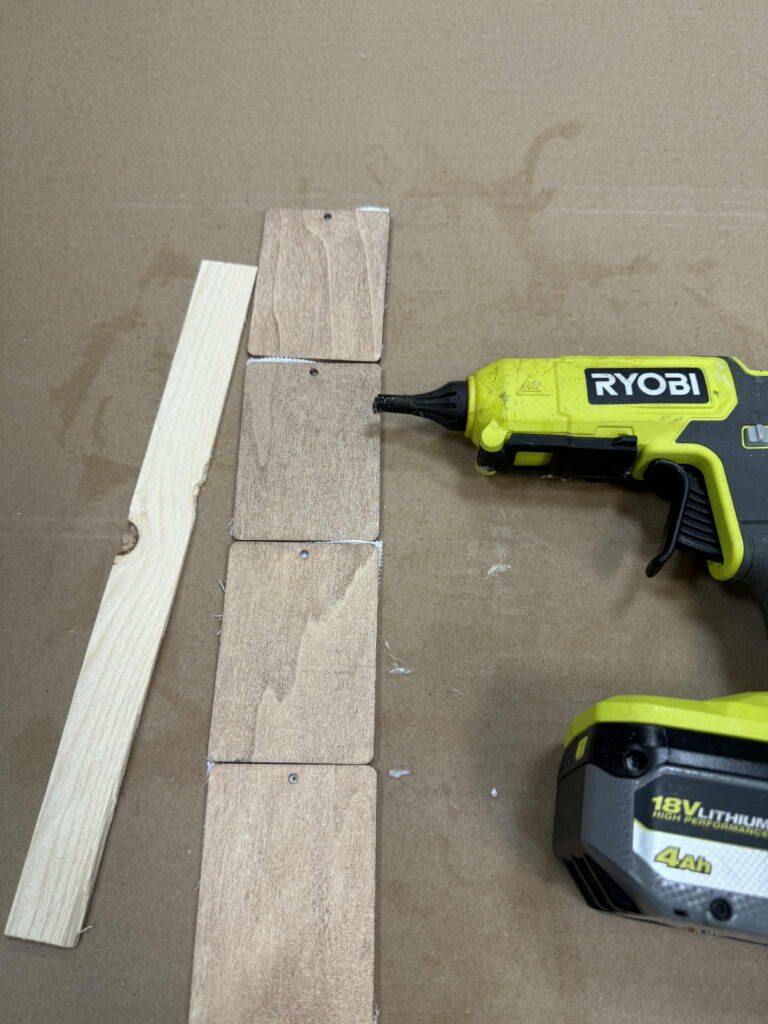
Once you have all of your lace squares cut out, it’s time to move on to painting the wooden rectangles. This is where you can really have fun and customize the look, because you can paint the rectangles any color you like. I decided to use a metallic antique bronze paint by DecoArt, which gives the pieces a beautiful aged look and adds a little extra depth and shine to the finished cross.

After all six wooden rectangles are painted, you’ll want to set them aside and give them plenty of time to fully dry. This step is important before moving on, since adding the lace too soon could cause the paint to smear or the lace to stick unevenly. Letting everything dry completely will help ensure a clean, polished finish when you start assembling the cross.

The next step is to use Mod Podge to attach the lace to the wooden rectangles. Apply a generous but even layer of Mod Podge to the surface of each rectangle, then carefully place the lace on top, smoothing it down as you go. This helps the lace adhere nicely and keeps it from bubbling or lifting, giving you a neat and finished look.

Be sure to apply the Mod Podge directly onto the wooden rectangle first, and then add another layer right over the lace once it’s in place. Sealing the lace this way helps secure it to the wood and gives it a smooth, finished look. Make sure everything is fully coated so the lace stays put and dries nice and flat.

Once the Mod Podge is completely dry, it’s time to start putting the pieces together. Arrange the rectangles into the shape of a cross, making sure everything is lined up the way you want it. When you’re happy with the placement, secure the rectangles together so the cross is sturdy and holds its shape.

For this step, you’ll want to flip the rectangles over so you’re working on the back side. Using hot glue, attach wooden shims across the rectangles to help hold everything together and add extra support. This method keeps the front of the cross looking clean while making sure the pieces are securely bonded and durable.

Once the cross is fully assembled, it’s time for the final touch—adding a little sparkle. This is where the project really comes to life. You can add as much or as little glitter as you like, focusing on certain areas or lightly dusting the entire cross. The glitter adds a subtle shine and helps highlight the lace details, giving the finished piece a beautiful decorative finish.

To add the glitter, start by applying tacky glue where you want the sparkle to show. Work in small sections so the glue doesn’t dry too quickly. Once the glue is on, sprinkle the glitter over the top, making sure it sticks evenly. Shake off any excess and let it dry completely for a pretty, shimmering finish.

You can find the glitter I used here: https://www.143vinyl.com/home.php?partner=461686
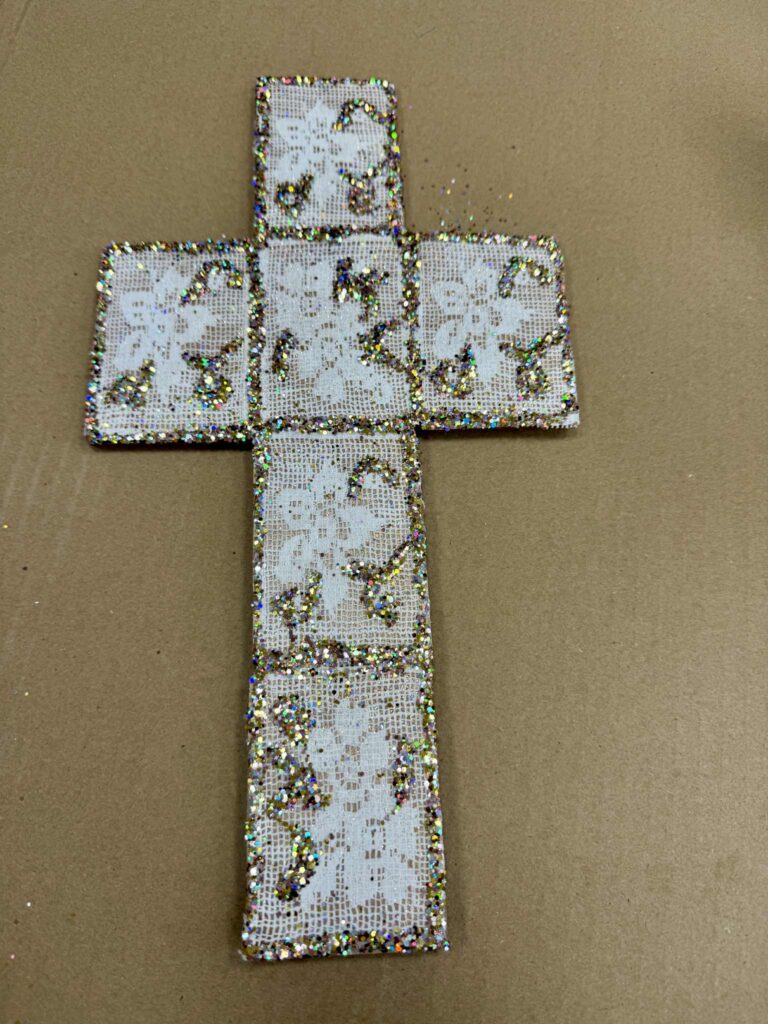
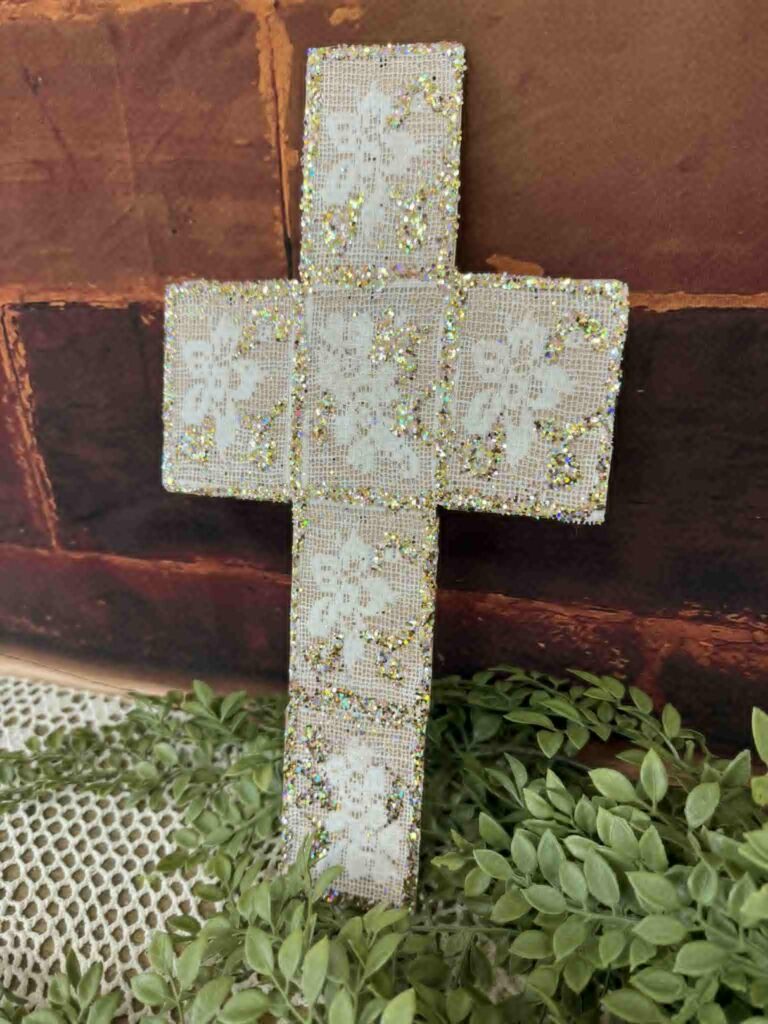
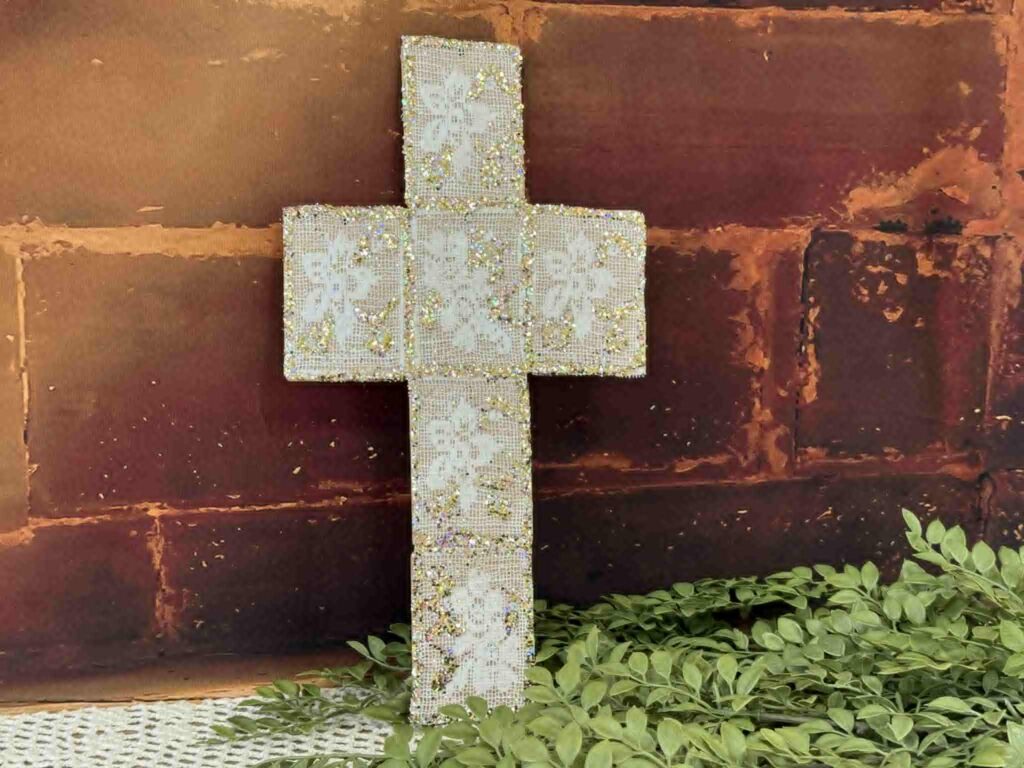
This cross is such an easy project to make, yet it adds so much charm wherever it’s displayed. It looks beautiful tucked into a shelf, placed on a mantel, or styled as part of a tabletop display. I hope this inspires you to get creative and give this cross a try using your own favorite colors and lace. It’s a simple project with a really meaningful and beautiful result.

This blog may contain affiliate links, which means I could earn a small commission if you make a purchase through them—at no extra cost to you. Thanks for supporting what I do!

468

29 Comments

  1. Nancy Brown
    Nancy Brown on February 2, 2026 at 11:56 pm

    Love this idea ,I am going to make one as soon as as can !N

    Reply
  2. Sharon Ann
    Sharon Ann on January 25, 2026 at 12:31 am

    Beautiful!

    Reply
  3. Sharon Nash
    Sharon Nash on January 14, 2026 at 2:10 pm

    Love the cross idea and most supplies I have on hand. I would go light on the glitter just because it’s so hard to get up.

    Reply
  4. Kristal Kaczinski Houser
    Kristal Kaczinski Houser on January 10, 2026 at 4:42 pm

    Beautiful ❤️ cross ✝️

    Reply
  5. Melissa Lovell
    Melissa Lovell on January 10, 2026 at 1:50 pm

    Love the lace and the way the glitter looks in the cross!

    Reply
  6. Deborah chaves
    Deborah chaves on January 10, 2026 at 12:37 pm

    I really love this and it’s very doable for people who aren’t real crafty as well. I love it. I’m gonna give it a shot.

    Reply
  7. Diane Strong
    Diane Strong on January 9, 2026 at 2:38 pm

    This is so pretty and unique. I love it❤️❤️❤️

    Reply
  8. Lisa Johnson
    Lisa Johnson on January 9, 2026 at 2:32 pm

    Love the square lace

    Reply
  9. Melanie Warman
    Melanie Warman on January 9, 2026 at 2:28 pm

    It’s so Beautiful!!! Definitely Sprinkled

    Reply
  10. Victoria LaMar-Haas
    Victoria LaMar-Haas on January 9, 2026 at 2:28 pm

    This is beautiful! So many possibilities. Definitely going to give this a try.

    Reply
  11. Dina Rudd
    Dina Rudd on January 9, 2026 at 2:20 pm

    It turned out so beautiful ❤️

    Reply
  12. Rebecca Donaldson
    Rebecca Donaldson on January 9, 2026 at 12:02 pm

    Wow, it is a beautiful cross!!!!

    Reply
    • Paula Hadeler
      Paula Hadeler on January 9, 2026 at 2:33 pm

      Wow, it is truly beautiful.

      Reply
  13. Wendie Reed
    Wendie Reed on January 9, 2026 at 8:41 am

    Beautiful cross, love it and excited for Friday night hangout

    Reply
  14. Theresa Vieira
    Theresa Vieira on January 9, 2026 at 8:09 am

    Barb it’s a beautiful cross ♥️

    Reply
  15. Brenda Tanner
    Brenda Tanner on January 9, 2026 at 3:47 am

    Well that’s turned out beautifully. Absolutely love this Barb. ❤️

    Reply
    • Melanie Gallaher
      Melanie Gallaher on January 10, 2026 at 12:27 am

      Beautiful cross ❤️❤️❤️

      Reply
  16. Jamie Stricklin
    Jamie Stricklin on January 9, 2026 at 2:57 am

    Very pretty! I wonder if cardboard would work also….hmmmm

    Reply
  17. Gloria Kinney
    Gloria Kinney on January 9, 2026 at 2:46 am

    I love the cross but I don’t like each rectangle outlined with the glitter. It’s beautiful. Maybe just outline the edges around the cross

    Reply
  18. Elly Mae
    Elly Mae on January 9, 2026 at 2:15 am

    this is so Beautiful Barb I love it can’t wait to make it.

    Reply
  19. Yvette Tracy
    Yvette Tracy on January 9, 2026 at 1:52 am

    Love it ! Awesome ideal Barb

    Reply
  20. Joanne Witty
    Joanne Witty on January 9, 2026 at 12:39 am

    Barb,
    I LOVE this cross!!!

    Reply
    • Ann Wilmar
      Ann Wilmar on January 9, 2026 at 1:35 am

      It’s very pretty!

      Reply
      • PAM WILTSE
        PAM WILTSE on January 9, 2026 at 1:57 am

        LOVE THE LACE, LOVE THE CROSS, LOVE YOU MS BARB, LOVE THE SHABBY TREE, LOVE FROM PAM IN OHIO

        Reply
    • Debbie Shell
      Debbie Shell on January 9, 2026 at 1:38 am

      Just ordered the lace barb , can’t wait for Friday Night Hangout 🥰

      Reply
    • Debbie Shell
      Debbie Shell on January 9, 2026 at 1:41 am

      Just ordered the lace barb , can’t wait for Friday Night Hangout 🥰 , can’t wait to make this

      Reply
  21. Heidi Eisen
    Heidi Eisen on January 9, 2026 at 12:37 am

    Barb, loving the lace cross. Beautiful for Easter too. 💗🤗

    Reply
  22. Debra Bragg
    Debra Bragg on January 9, 2026 at 12:26 am

    I love it Barb! I think I will try and make this … thanks for sharing with us….

    Reply
  23. Kerri Hellwig
    Kerri Hellwig on January 9, 2026 at 12:09 am

    Absolutely beautiful, Barb, and I love the creativity!

    Reply

Submit a Comment Cancel reply

Your email address will not be published. Required fields are marked *

Recent Posts

  • Easy Wooden Bunny Tray DIY For Spring
  • How To Decorate Your Home With Vintage Finds
  • Corner Cabinet Decor
  • Wooden Tree Makeover Using Lace
  • A Collection Of Our Lace DIYs

JOIN OUR MAILING LIST AND TEXT LIST BY CLICKING HERE!

  • Privacy Policy
  • Checkout
  • Cart
  • Facebook
  • X
  • Instagram
© Copyright 2026 | The Shabby Tree | Designed by Customized Web Development